Screen Printing transfers have become an Essential Technique for artists and designers in the Graphics and apparel industry. They offer versatility, precision, and the ability to reproduce intricate designs on a variety of substrates. In this article, we will dive into mastering the art of screen print transfers: a 6 step-by-step comprehensive guide Whether you’re a seasoned screen-printing designer or a beginner, this guide will equip you with the knowledge and skills to create stunning transfers. First, abbreviated the history and origin of screen print transfers.
Screen print transfers, also known as heat transfers or plastisol transfers, have a rich history that dates back several decades. The technique originated as an alternative to direct screen printing and gained popularity due to its versatility and convenience. Here’s an overview of the history and origin of screen print transfers:
Early Development: The concept of screen printing itself can be traced back to ancient China, where stencils were used to create intricate designs on fabric. However, the modern screen-printing process emerged in the early 20th century. It was primarily used for commercial purposes such as printing signage, posters, and textiles.
The invention of Plastisol Ink: In the 1950s, a significant development occurred with the invention of Plastisol ink. This ink is in a semi-solid state at room temperature but it turns into a liquid when heated and it is a PVC-based compound. Plastisol ink revolutionized the screen-printing industry by offering increased durability, vibrant colors, and easy application.
Introduction of Heat Transfers: In the 1960s, screen print transfers were introduced as a method to simplify the screen-printing process. Instead of directly printing on the final substrate, designs were first screen printed onto a release paper or carrier sheet using plastisol ink. These printed transfers could then be applied to various surfaces using heat and pressure.
Advantages and Applications: Screen print transfers offered several advantages over direct screen printing. They allowed for mass production of pre-printed designs that could be stored and applied on-demand, reducing setup time and costs. Additionally, transfers facilitated printing on difficult surfaces such as curved or uneven objects. They found applications in various industries, including apparel, promotional products, sports uniforms, and more.
Technological Advancements: Over the years, advancements in printing technologies and materials further improved the quality and efficiency of screen print transfers. These include the development of specialized heat transfer papers, advancements in ink formulations, and improvements in heat press equipment.
In Modern Days, screen print transfers continue to be widely used in the Textile industry, Graphics, and promotional products industries. The process involves preparing the artwork, screen printing the design onto a release paper, and then using a heat press to transfer the design onto the desired substrate. With the rise of digital printing, digital screen print transfers have also emerged, allowing for high-resolution prints and complex designs. It’s worth noting that the exact origin and specific individuals credited with the invention of screen print transfers may vary, as the development of this technique involved multiple innovations and contributions from various screen-printing pioneers.
Materials Needed for Screen Printing Transfers:
Before diving into the process, gather the following materials:
Screen printing frame: Choose a frame with an appropriate mesh count for your design.
Emulsion and emulsion sensitizer: Used to create stencils on the screen.
Transparency film or vellum paper: For printing the design.
UV light source: Required to expose the emulsion-coated screen.
Water-resistant tape: Used for blocking unwanted areas on the screen.
Screen printing ink: Opt for high-quality inks suitable for fabric printing.
Squeegee: Used to evenly apply ink to the screen.
Heat press or iron: Necessary for transferring the design onto the desired substrate.
Release paper or Teflon sheets: To protect the design during the heat transfer process.
Screen Printing TransfersStep-by-Step Guide:
Design Creation and Film Preparation:
Create or select the design you want to transfer onto the substrate.
Using graphic design software, convert the design into a high-resolution image.
Print the design on transparency film or vellum paper, ensuring it matches the desired transfer size.
Screen Preparation:
Coat the screen with emulsion following the manufacturer’s instructions.
Let the emulsion dry in a light-safe environment.
Once dry, place the transparency film with the printed design on the emulsion-coated screen.
Secure the film and screen together using a glass or a weight, ensuring good contact.
Exposure and Developing:
Expose the screen to UV light, either using a lightbox or a direct UV light source.
The exposure time depends on the emulsion and light source, so follow the manufacturer’s recommendations.
Rinse the screen with water to remove the unexposed emulsion, revealing the stencil.
Blocking Unwanted Areas:
Use water-resistant tape to cover any areas on the screen that you want to remain unprinted.
Ensure the tape adheres tightly to prevent ink from seeping through.
Printing:
Place the screen onto the desired substrate, such as a T-shirt or fabric.
Pour a line of ink at one end of the screen, just above the design.
Holding the squeegee at a 45-degree angle, drag the ink across the screen, exerting even pressure.
Repeat the squeegee motion a few times to ensure full coverage.
Lift the screen carefully to reveal the printed design. Allow the ink to air dry or use a dryer if necessary.
Transferring the Design:
Place the printed substrate onto a heat press or use an iron. b. Ensure the heat press or iron is set at the correct temperature for the fabric type.
Position a release paper or Teflon sheet on top of the printed design.
Apply heat and pressure according to the heat transfer paper instructions.
Once the transfer is complete, peel off the release paper while the design is still warm.
Type of screen print transfers
There are several types of screen print transfers used in the process of transferring designs or images onto various substrates. Here are some common types:
Plastisol Transfers: Plastisol transfers involve screen printing the design onto a special release paper using plastisol ink. The transfer is then heat-pressed onto the final substrate, such as garments or promotional products. Plastisol transfers are known for their durability and vibrant colors.
Hot Peel Transfers: Hot peel transfers are created by screen printing the design onto a transfer paper using plastisol or water-based ink. After heat pressing, the transfer paper is peeled off while still hot, leaving the printed design on the substrate. Hot peel transfers are suitable for achieving a soft hand feel and fine detail.
Cold Peel Transfers: Cold peel transfers are similar to hot peel transfers, but they require the transfer paper to cool down before peeling it off. Cold peel transfers are often used for designs that require a thicker ink deposit and better opacity.
Sublimation Transfers: Sublimation transfers involve printing the design onto transfer paper using specialized sublimation inks. The transfer is then heat pressed onto polyester-based substrates, where the ink converts from a solid to a gas, bonding with the fabric. Sublimation transfers offer full-color printing and excellent durability.
Glitter Transfers: Glitter transfers incorporate metallic or sparkly effects into the design. They are created by screen printing an adhesive layer onto transfer paper and then applying a layer of glitter on top. Heat pressing fuses the glitter onto the substrate, creating a sparkling effect.
Reflective Transfers: Reflective transfers utilize reflective materials to enhance visibility in low-light conditions. The reflective layer is screen printed onto transfer paper and then heat-pressed onto the desired substrate. Reflective transfers are commonly used in safety wear, sports apparel, and promotional items.
Puff Transfers: Puff transfers create a raised or three-dimensional effect on the printed design. The transfer is created by screen printing a special puff ink onto transfer paper. When heat is pressed, the ink expands and gives a raised texture to the design.
These are just a few examples of screen print transfers commonly used in various applications. The choice of transfer type depends on factors such as the desired effect, substrate material, durability requirements, and printing equipment available.
A comprehensive guide on how to screen print at home:
Screen printing Transfers at home allows you to unleash your creativity and produce custom prints on various surfaces. Here’s a step-by-step guide to get you started:
Digitally Design Creation: Create or select the design you want to screen print. Ensure it’s high-resolution and suitable for the screen-printing process.
Materials Preparation: Gather the necessary materials, including a screen-printing frame, emulsion, emulsion sensitizer, transparency film or vellum paper, UV light source, water-resistant tape, screen printing ink, squeegee, substrates (such as T-shirts or paper), and a plastic sheet or newspaper to protect your work surface.
Screen Preparation: Attach the screen-printing mesh to the frame tightly and evenly. Coat the screen with emulsion using a scoop coater, ensuring even coverage on both sides. Let the emulsion dry in a light-safe environment.
Stencil Creation: Print your design on transparency film or vellum paper. Cut out the design, leaving a small border around the edges. Attach the stencil to the dry emulsion-coated screen using transparent tape or adhesive.
Exposing the Screen: In a darkroom or light-safe environment, position the screen under the UV light source. Expose it according to the emulsion manufacturer’s instructions. Carefully remove the stencil after the recommended exposure time.
Setting up the Printing Area: Choose a well-ventilated area with a flat and clean surface. Lay down a plastic sheet or newspaper to protect your work surface from ink spills.
Printing: Place the substrate (e.g., a T-shirt) on the printing surface, ensuring it’s flat and wrinkle-free. Position the screen over the substrate, aligning it with the desired printing area. Pour a line of ink above the design on the screen. Using a squeegee, apply even and firm pressure to pull the ink across the screen, covering the entire design. Repeat the motion a few times for complete coverage. Lift the screen carefully to reveal the printed design on the substrate.
Curing the Print: Follow the ink manufacturer’s instructions for curing. Heat set the print using an iron or heat press, or allow it to air dry before heat setting.
Cleaning the Screen: After printing, rinse the screen with water to remove excess ink. Use a screen cleaner or mild detergent to remove any residual ink or emulsion. Rinse thoroughly and let it dry completely before reusing.
Refine your screen printing transfers skills with continuous experimentation and practice and at your own home you’ll create stunning prints Enjoy the process and let your creativity flourish!
This is Helps to Creating a graphic Elements and theme of Festivals and Events like-
Top 3 Screen Printing Transfers Printers and their Pros and Cons
When it comes to screen print transfer printers, there are several options available in the market. Here are three popular choices, along with their pros and cons:
1. EpsMHM Synchroprint 5000:
It is the only screen printing machine that features an automatic screen positioning system where motors are used to control and record the screen position. Once set, you can save it in the future with the memory capacity being unlimited.
Pros:
High Precision: The MHM Synchroprint 5000 is known for its exceptional precision and accuracy. It can achieve intricate details and fine lines, making it suitable for high-quality printing applications.
Fast Production Speed: This screen printer is designed for high-speed production, allowing you to complete large orders in a shorter time frame. It can handle rapid printing cycles, increasing your overall productivity.
Advanced Automation: The Synchroprint 5000 comes with advanced automation features, such as automatic registration and automatic screen cleaning. These features help streamline the printing process, reduce manual labor, and improve efficiency.
Versatility: The MHM Synchroprint 5000 offers versatility in terms of the types of garments and materials it can print on. It can handle various fabric types, including cotton, polyester, and blends, enabling you to cater to a wide range of customer needs.
User-Friendly Interface: The machine is equipped with a user-friendly interface and intuitive controls, making it easier for operators to set up and operate. It reduces the learning curve for new users and allows for smoother production runs.
Cons:
Cost: The MHM Synchroprint 5000 is a high-end screen printing machine, and its cost may be a significant investment for small or medium-sized printing businesses. The initial purchase price, as well as ongoing maintenance and consumables, can be expensive.
Space Requirements: This printer has a large footprint and requires ample space in your production facility. If you have limited space available, it may be challenging to accommodate this machine.
Complex Setup: While the user interface is user-friendly, the initial setup and calibration of the machine can be complex. It may require technical expertise or training to optimize the machine for optimal performance.
Maintenance and Repair: Like any complex machinery, the Synchroprint 5000 may require regular maintenance and occasional repairs. Depending on your location and availability of service providers, obtaining support and spare parts might be a challenge.
Learning Curve: While the user interface is designed to be user-friendly, mastering all the features and capabilities of the Synchroprint 5000 may take time. It may require training and practice to maximize its potential and troubleshoot any issues that arise.
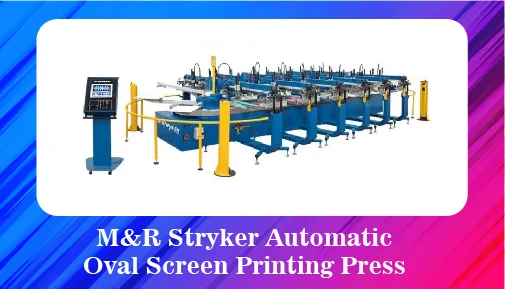
M&R Stryker is a versatile and affordable oval screen printing there are no restrictions on printhead placement. it is a 10-station-based module and can be expanded to create 16, 22, 28, up to 52 station configurations. In other words.
Pros:
High-Speed Production: The M&R Stryker is known for its exceptional production speed. It can rapidly print a large number of garments in a short amount of time, increasing overall productivity and efficiency.
Precision Registration: This screen printing press offers precise registration capabilities, ensuring accurate alignment of multiple colors and designs. It allows for consistent and high-quality prints, even with complex designs.
Versatility: The Stryker is designed to handle a wide range of substrates, including garments, textiles, and flat materials like posters or signs. Its versatility enables you to expand your product offerings and cater to diverse customer needs.
Advanced Control Features: The press comes equipped with advanced control features, such as touchscreen interfaces and programmable settings. These features make it easier to set up, operate, and control various aspects of the printing process.
Expandable Configuration: The M&R Stryker offers an expandable configuration, allowing you to add additional print heads and stations as your business grows. This scalability feature ensures that the press can meet your increasing production demands.
Cons:
Cost: The M&R Stryker is a high-end automatic screen printing press, and its initial cost may be a significant investment for small or medium-sized printing businesses. Additionally, ongoing maintenance and consumable costs should be considered.
Space Requirements: Similar to other automatic screen printing presses, the Stryker requires a substantial amount of space in your production facility. Adequate space must be allocated for the machine and its accompanying accessories.
Maintenance and Repair: Like any complex machinery, the Stryker may require regular maintenance and occasional repairs. Depending on your location and availability of service providers, obtaining support and spare parts might be a challenge.
Operator Training: Operating the Stryker effectively may require specialized training, especially for complex settings and troubleshooting. Adequate training for your staff will be necessary to ensure optimal performance and avoid costly mistakes.
Learning Curve: While the Stryker offers advanced features and capabilities, mastering its full potential may take time and practice. Operators may need to familiarize themselves with the press and its controls to maximize efficiency and productivity.
3. MHM IQ-Oval Compact:
MHM iQ Oval machines are modular and can be configured to have a maximum of 60 stations for almost any production capacity (pieces/h) is 1200 – 1800 requirement that can be expanded in the future. In other words, it accommodates your growing screen printing requirement.
Pros:
Space-Saving Design: The MHM IQ-Oval Compact is specifically designed to occupy a smaller footprint compared to other screen printing machines. It allows for efficient space utilization in your production facility, making it suitable for businesses with limited space.
Precise Registration: This screen printer offers precise registration capabilities, ensuring accurate alignment of colors and designs. It enables you to achieve consistent and high-quality prints, even with intricate designs.
Fast Production Speed: The IQ-Oval Compact is known for its high-speed production capabilities. It can handle rapid printing cycles, allowing you to complete large orders in a shorter amount of time, thereby increasing overall productivity.
Advanced Control Features: The press is equipped with advanced control features, such as a user-friendly touchscreen interface and programmable settings. These features make it easier to set up, operate, and control various aspects of the printing process.
Versatility: The MHM IQ-Oval Compact is versatile and can handle various substrates, including garments, textiles, and flat materials. This flexibility allows you to diversify your product offerings and cater to different customer needs.
Cons:
Cost: The MHM IQ-Oval Compact, being a high-quality screen printer, may have a higher upfront cost compared to entry-level or manual machines. It is important to consider your budget and the expected return on investment before making a purchase decision.
Limited Expansion Options: Unlike larger screen printing presses, the IQ-Oval Compact may have limited expansion options. If your business experiences significant growth, you may need to upgrade to a larger machine instead of simply adding more print heads or stations.
Maintenance and Repair: Like any machinery, the IQ-Oval Compact may require regular maintenance and occasional repairs. It is important to factor in ongoing maintenance costs and consider the availability of service providers and spare parts.
Learning Curve: Although the IQ-Oval Compact is designed to be user-friendly, there may still be a learning curve for operators who are new to automatic screen printing. Adequate training and practice may be required to optimize its performance.
Limited Print Size: Due to its compact size, the IQ-Oval Compact may have limitations on the maximum print size it can accommodate. If you require larger prints, you may need to consider alternative printing methods or invest in a larger machine.
It’s important to note that the selection of a screen print transfer printer depends on your specific needs, budget, and level of expertise. Consider factors such as print quality, media compatibility, connectivity options, and long-term costs when making a decision. Additionally, researching and comparing models based on your requirements will help you find the best printer that suits your screen printing needs.
Heat Press vs Screen Print
Heat press and screen printing are two different methods used for printing designs onto garments or other fabric surfaces. Here’s a comparison between the two:
Heat Press:
Process: Heat press involves using a machine that applies heat and pressure to transfer a design from a transfer paper or vinyl onto a garment. The design is typically printed using inkjet or laser printers onto a special transfer paper or vinyl.
Versatility: Heat press allows for more versatility in terms of design customization. It is often used for printing individual names, numbers, or personalized designs on garments. It is also suitable for small print runs or one-off designs.
Color Options: Heat press can produce vibrant and full-color designs, including gradients and photographic images. It is especially effective for designs with a high level of detail and color variation.
Durability: The durability of heat press prints can vary depending on factors such as the quality of the transfer material, the application process, and the care instructions followed. Generally, heat press prints are considered durable and can withstand multiple washes if applied correctly.
Screen Printing:
Process: Screen printing involves creating a stencil on a mesh screen and then applying ink directly onto the fabric through the stencil. Each color requires a separate screen, and the ink is pushed through the screen using a squeegee.
Cost Efficiency: Screen printing is cost-effective for large print runs due to the efficiency of the process. Once the screens are set up, reproducing the design onto multiple garments becomes relatively quick and affordable.
Ink Options: Screen printing offers a wide range of ink options, including specialty inks such as metallic or glow-in-the-dark. It is especially suitable for designs with solid colors or bold, opaque prints.
Longevity: Screen printing is known for its durability and longevity. The ink used in screen printing penetrates the fabric fibers, creating a lasting bond. Properly cured screen prints can withstand numerous washes and maintain their vibrancy over time.
Both heat press and screen printing have their advantages and are chosen based on factors like design complexity, quantity of prints, and budget. Each method offers unique possibilities for creating custom designs on garments and other fabric items.
digital print vs screen print
Digital print and screen print are two distinct methods used for printing designs onto various surfaces, including garments. Here’s a comparison between the two:
Digital Print:
Process: Digital printing involves using inkjet or laser printers to directly apply the design onto the fabric or substrate. The design is typically created digitally using graphic design software, and the printer transfers the design onto the material using ink.
Color Options: Digital printing offers a wide range of color options, including gradients and photographic prints. It can reproduce intricate details and complex color variations accurately, making it suitable for designs with high levels of detail and color complexity.
Customization: Digital printing allows for easy customization and personalization. Each print can be unique, making it ideal for small print runs or individualized designs.
Cost Efficiency: Digital printing is cost-effective for small to medium-sized print runs. It does not require the setup of screens or stencils, making it more economical for lower quantities.
Screen Print:
Process: Screen printing involves creating a stencil on a mesh screen and then applying ink onto the fabric through the stencil using a squeegee. Each color in the design requires a separate screen, and the ink is pressed through the screen onto the material.
Durability: Screen prints are known for their durability and longevity. The ink used in screen printing permeates the fabric, creating a strong bond that can withstand numerous washes without significant fading or deterioration.
Cost Efficiency: Screen printing is cost-effective for large print runs. Once the screens are set up, reproducing the design onto multiple garments becomes efficient and economical.
Ink Options: Screen printing offers a wide range of ink options, including specialty inks such as metallic or glow-in-the-dark. It is particularly suitable for designs with solid colors or bold, opaque prints.
The choice between digital print and screen print depends on various factors such as the desired design complexity, quantity of prints, budget, and the specific requirements of the project. Digital printing is advantageous for customization and intricate designs, while screen printing excels in terms of durability, cost efficiency for larger quantities, and the ability to use specialty inks.
Plastisol Heat Transfers
Plastisol heat transfers are a type of screen print transfer that uses plastisol ink to create a design that can be heat pressed onto garments or other fabric surfaces. Plastisol ink is a PVC-based ink that remains in a semi-liquid state at room temperature but solidifies when heated.
Here’s an overview of the process of creating and using plastisol heat transfers:
Design Creation: The design for the transfer is created using graphic design software or by hand. The design is typically separated into different colors or layers, similar to traditional screen printing.
Screen Printing: The design is screen printed onto a release paper or transfer sheet using plastisol ink. Each color in the design requires a separate screen, and the ink is pressed through the screen onto the transfer sheet. The plastisol ink sits on top of the release paper, creating a mirror image of the design.
Curing: After the design is printed, the transfer sheet with the plastisol ink is passed through a conveyor dryer or heat tunnel. The heat cures the ink, causing it to solidify and adhere to the transfer sheet.
Application: To use the plastisol heat transfer, the transfer sheet is placed onto the garment or fabric with the plastisol ink side facing down. Heat and pressure are applied using a heat press machine. The heat causes the ink to liquefy and transfer from the transfer sheet onto the fabric. The pressure ensures proper adhesion of the ink to the fabric.
Peeling: Once the transfer has been heating pressed onto the fabric, the release paper is peeled off, leaving behind the transferred plastisol ink design on the garment.
Plastisol heat transfers offer several advantages, including the ability to produce vibrant and opaque designs, durability, and the ability to reproduce intricate details. They are commonly used in the garment industry for printing logos, graphics, and designs onto various fabric items.
Plastisol transfer paper
Plastisol transfer paper
Plastisol transfer paper, also known as plastisol transfer release paper or simply transfer paper, is a specialized paper used in the production of plastisol heat transfers. It serves as the carrier or substrate onto which plastisol ink is screen printed to create the transfer design.
Here are some key points about the plastisol transfer paper:
Purpose: Plastisol transfer paper is designed to hold the plastisol ink during the printing process and allow for easy transfer onto the final fabric or garment.
Compatibility: Plastisol transfer paper is specifically formulated to work with plastisol inks, which are the most commonly used inks for screen printing. It is not compatible with other types of inks, such as water-based or discharge inks.
Release Coating: The transfer paper is coated with a release agent or silicone coating on one side. This coating prevents the plastisol ink from sticking to the paper during the curing process and allows for easy release and transfer onto the fabric.
Thickness and Weight: Plastisol transfer paper comes in various thicknesses and weights, ranging from lightweight to heavyweight options. The complexity of the design is the main factor in the choice of selection of Paperweight, these things are important to achieve the desired level of opacity, and the intended application.
Handling and Storage: Plastisol transfer paper should be handled with care to avoid smudging or damaging the printed design. It is recommended to store the paper in a cool, dry place to maintain its quality and prevent ink from prematurely curing.
When using plastisol transfer paper, the plastisol ink is screen printed onto the paper in a mirror image. The printed transfer sheets are then cured to solidify the ink. Once cured, the transfer paper is ready to be applied to the fabric using a heat press, allowing the ink to transfer and adhere to the fabric’s surface.
Plastisol transfer paper provides a convenient method for producing high-quality, ready-to-apply plastisol heat transfers. It is commonly used in the garment industry for printing custom designs, logos, and graphics onto various fabric items.
Silk Screen transfer
Silk screen transfer, also known as screen printing transfer or heat transfer, is a method of applying a design or image onto a substrate using a transfer sheet. It involves creating a stencil on a mesh screen, applying ink to the screen, and transferring the ink onto the substrate using heat and pressure. Here are some benefits, uses, and applications of silk screen transfer:
Benefits:
Versatility: Silk screen transfer can be used to print on a wide range of substrates, including fabrics (such as t-shirts, hoodies, and tote bags), ceramics, plastics, metals, and paper. This versatility allows for various applications and customization options.
Vibrant and Durable Prints: Screen printing produces vibrant and long-lasting prints. for making opaque and color-rich used the ink used is highly pigmented in the process, The prints are also resistant to fading, cracking, and peeling when properly cured.
High Quality and Detail: Silk screen transfer allows for fine detail and precision in designs. The process can reproduce intricate patterns, gradients, and even photographic images with high accuracy and resolution.
Cost-Effective for Small to Medium Runs: Screen printing transfers are cost-effective for small to medium production runs. Once the screen is prepared, multiple transfers can be produced efficiently, making it suitable for producing batches of custom-designed items.
Uses and Applications:
Custom Apparel: Silk screen transfer is widely used in the apparel industry for customizing t-shirts, sweatshirts, jerseys, and other clothing items. It enables the production of personalized garments for individuals, sports teams, businesses, and events.
Promotional Products: Many promotional products, such as bags, hats, and accessories, feature screen printed designs. Silk screen transfer allows for branding, logos, and artwork to be applied to these items, making them effective marketing tools.
Art and Merchandise: Artists and designers often utilize silk screen transfer to create limited edition prints, posters, and artwork reproductions. It provides a way to replicate their designs with consistency and high quality.
Industrial Applications: Silk screen transfer is also used in industrial applications, such as printing electronic circuit boards, nameplates, signage, and labels. It allows for precise and durable markings on various materials.
DIY Projects: Silk screen transfer kits are available for do-it-yourself projects. Crafters and hobbyists can use these kits to create their own custom prints on fabrics, home decor items, and more.
Overall, silk screen transfer offers versatility, vibrant prints, and durability, making it a popular choice for customizing a wide range of products across various industries.
Risograph print design combines the affordability and speed of digital duplication with the unique aesthetic of screen printing. Using spot colors and a stencil-based process, Risograph creates vibrant and textured prints with a grainy, dotty appearance. for creating posters, zines, art books, and other materials for printed items and It is a popular choice among artists, designers, and publishers. The cost-effectiveness and high-speed production make it ideal for large print runs, while the environmentally friendly soy-based inks and minimal energy consumption contribute to its appeal. Risograph print design offers a distinct visual style that has captured the attention of creatives seeking an affordable and eye-catching printing solution.
Conclusion:
Screen Printing Possibilities for artists and designers, allowing them to create intricate and vibrant designs on various substrates with ease. By following the step-by-step guide outlined in this article, you can master the art of screen print transfers. for best results, they use the right and high-quality materials and Proper screen preparation, exposure, and developing techniques are crucial for creating sharp and durable stencils. Additionally, blocking unwanted areas and using the right ink consistency is essential for achieving clean and precise prints. The final step of transferring the design onto the substrate requires careful attention to temperature and pressure settings. Whether using a heat press or an iron, follow the manufacturer’s instructions to ensure the design adheres perfectly to the fabric. Experiment with different color combinations, substrates, and design variations to explore the endless possibilities of screen print transfers. With practice and creativity, you can create personalized garments, promotional items, and works of art that stand out with their professional appearance, and this Social media-oriented world has lots of opportunities to showcase Art or Design in the Design Community.
Remember, mastering the art of screen print transfers takes time and patience. learn from mistakes and perform with a positive mindset Each attempt brings you closer to achieving the desired results. Embrace the artistry of screen-printing transfers and let your creativity flourish. With dedication and practice, you’ll be able to produce impressive and captivating designs that leave a lasting impression.


Leave A Comment